Search This Blog

Tuesday, May 15, 2012

Sixth Grade Projects Continued


 6th graders have been working hard to finish up their projects before the end of the year rolls around.  Here are a few more in progress/ done self portraits and guitar projects.  The self-portraits have been proving to be a time consuming project.  Students are showing a lot of dedication and they are turning out better than I expected.  I have been helping with some eye balls and mouths, but otherwise, they have been filling in with all the magazine and creating beautiful value-scale renditions of their faces.  Guitars turned out to be a two month project.  I am so thrilled that I picked a theme that kept students motivated throughout all the steps of the project.  We are finallly adding the final touches and students are taking their instruments home. It is great to see the rock bands performing at the end of the day during bus duty.  We used screws and popsicle sticks for the tuning pegs at the top of the guitars.  The students are really proud of these two projects and it is so awesome to see their excitement when they get to take them home!!


Monday, May 14, 2012

Keith Haring Murals

We recently began a new project about Keith Haring.  My 5th graders had never heard of him before and it was exciting seeing them light up when they explored his work.  We started out by reading a biography on him.  I found it here.  I then showed a variety of his murals and artwork.  We also explored his website haringkids.com  The students really loved the silly flash videos they have on the website.  Students practiced drawing in his simplistic style.  I stressed the idea of being imaginative and creative.  I wanted them to think outside the box and come up with truly original and inspired ideas.  I explained that Keith Haring sometimes created artwork that was meant to simply be fun, and other times it was meant to send a message.  Once we practiced our drawing skills, students split into groups of 2 to 4 students and received large pieces of butcher paper to create their own mural.  They used tempera paint to add their designs. At the very end they will add black outlines around their shapes following the style of Keith Haring.  During the 2nd week of this project Google actually celebrated Keith Harings birthday on their homepage and students were so excited to tell me about it. So far, the projects are looking fabulous.  My only problem is finding enough space in my room to let them all dry.  I have 5th grade classes back to back, so by the time my 1st class leaves, almost all my surfaces are covered with wet murals.  My 2nd group has been doing a nice job steering clear of the wet projects and working in their areas in an organized manner.   It is great to see the students delegate tasks to one another and work so cooperatively in their groups!! Each group had to come up with a major theme for their artwork.  Some groups are doing themes that are about bullying, patriotism, friendship, saying no to drugs, etc. Others are doing fun and silly themes like dancing, sports, aliens, etc. I am glad I could incorporate a group project into my plans this year.  I  don't have too many done ones yet, will hopefully posts some finished projects soon!!

Monday, April 23, 2012

Monochromatic Self Portraits


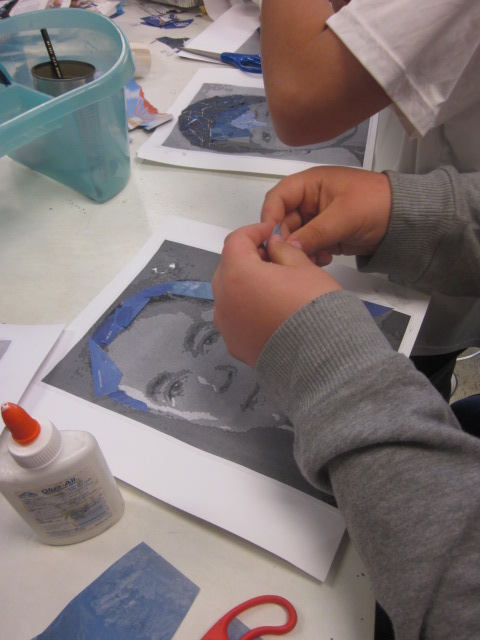
6th graders are creating collage self- portraits. I took a picture of each of their faces and then went into photoshop and printed them out in black and white with a posterized filter over them. This way students could pick one color and create a value scale on their face. We learned about monochromatic color schemes. Students are focusing on using magazine clippings to block out the values on their face. I created an example of Mr. Glad for the students to get inspired by (I posted it at the bottom.) We looked at the work of Chuck Close and how he uses blocks of color to represent areas on the face. The students will choose a separate color for their background, preferably a complimentary color. So far, they are doing a very nice job. I will post again when they are all finished!


Tuesday, April 10, 2012

Georgia O'Keeffe Pastels


5th graders learned about the life and work of artist Georgia O'Keeffe. We focused on her use of emphasis, balance, and unity. Students incorporated their knowledge of value and blending to create a Georgia O'Keefe inspired pastel project. They used both oil pastels and chalk pastels. I used a short presentation to introduce O'Keeffe and the key vocabulary You can find my presentation here. We spent about 3 class period on the actual art making process. They turned out beautiful and I had many students asking to come in to finish up during recess. It was great to see how much pride and motivation the kids showed for this assignment!

Thursday, March 1, 2012

Winter Scenes

5th graders created winter scenes. They added birch trees and a split rail fence to create the look of an Ohio landscape. We discussed adding texture to our trees by creating horizontal black lines with corrigated cardboard. We used chalk pastels to create a blended skyline with either warm or cool colors. We discussed that colors that are next to eachother on the color wheel, such as warm colors, blend together to create new hues. We used colored pencils to create a split rail fence on the horizon line. We discussed atmospheric perspective; students tried to create a foreground, middleground, and background. To create the illusion of things moving back in space, some made their split rail fences extra small. The next step was to create a shadow for all our trees. This helped to give our artwork a more realistic quality. The final step was to use a spray bottle of white tempera and water. This made it look like snow was falling from the sky. I used a short prezi presentation to show students some examples of atmospheric perspective. You can check it out here

Friday, February 24, 2012

Winter Birds

6th graders are creating winter bird pictures to decorate and add some winter spirit to the halls. We have had an unseasonably warm February, so these birds actually look a little out of place on snow covered trees. However, the kids are really taking pride in them, and they are turning out amazing!!! We started out this lesson by looking at some examples of realism in art. We discussed what makes something a successful work of realism. We touched upon shadows and highlights, color matching, and attention to detail. I printed off packets with color pictures of all the birds so that students could use them as a reference throughout the entire process. We practiced drawing our birds several times before moving to the final copy paper. Students used simple shapes to break up the form of their bird and create a construction line map to work from. I was astonished at how quickly they picked it up. For the final copy we initially used brown paint to add a tree with a few branches. Students decided how big or how small to draw their tree and branches. Once they were confident with their drawing abilities, the student then drew the bird on the tree branch and began filling in with oil pastels. The final steps were to add oil pastel details to the tree, such as, shadows, bark, pine needles, and snow. To finish them off we sprayed them with a squirt bottle of half water, half white tempera. There are still several students working on their finishing touches, but the ones that are finished are lookin good!!!! I wanted to keep the birds we created native to Ohio, so, I let them choose from a Cardinal, Chickadee, or Blue Jay as their subject. Unfortunately, I don't have any pictures of finished blue jays yet. I will definitely post more finished products soon. If you would like to see the presentation I used to introduce the lesson it is here. My full plan is here.

Tuesday, February 21, 2012

Peter Max Inspired Guitars


My 6th graders and a few fifth graders are creating paper mache guitars. To initially start the project we discussed the theme of music in the art world. I showed a presentation about music being a common theme in art throughout the ages. I touched on Picasso using music as a basis for many of his artworks. We discussed how music has changed in our daily culture over time. How is it different now than it may have been in ancient times? Technology makes it much more accessible. We focused on the topic of "Popular Culture" what is it? How is music a part of it. What is pop art. We looked at a few pieces of pop art and we finally arrived at the artist Peter Max. We addressed how he took music from a theme in 2-D art, to a sculptural idea in his famous piano and guitar artworks. If you would like to see the full presentation click here. Once we had our discussion underway we began interpreting the project. Each student was going to be building their own guitar. They needed to come up with an initial design for the body and cut that out of two pieces of cardboard. This took some leg work on my part because I had to have my husband and my father cut about 300 sheets of cardboard. I gave each student one 12x18 drawing paper and two 12x18 pieces of cardboard. They needed to sketch out an outline for their guitar on the drawing paper. Once they had the outline they needed to cut it out and use it as a template to trace onto their pieces of cardboard. They then cut out both pieces of cardboard. To the right you can see the two finished pieces of cardboard a student cut. They were creating a guitar shaped like their favorite video game character.


Once you had a front and back for the body of the guitar you then stuffed it with newspaper and taped the edges together. I gave each student the neck of their guitar by cutting strips of tag board. They taped one strip to the front and one strip to the back and again stuffed the middle, and taped the edges. We also used small squares of tag board to create that top head of the guitar where the strings attach to the tuning pegs.
After all that construction we finally started paper mache. It has been about 5 weeks and we are almost done covering them with all our layers of paper mache. Next, I am going to have the kids cover them in gesso and then paint on their designs. I bought twine for the strings, gems and buttons for decorating, and screws from home depot to create the tuning pegs at the top. The kids are having a greeat time, and I am so impressed to see everyone motivated in the art room!! To see my full lesson plan you can click here